11/30/2010

A Yummy Pie Recipe

So I am the only one in my family that doesn't like Pumpkin pie and I never have - I know, how Un-American :)  So I decided to try a new dessert recipe this year on Thanksgiving.  I figured if it didn't come out right then I would be the only one without dessert. Good thing for me it came out great.

So the dessert that I decided to try is Paula Dean's My Friend Flicker Pie. It was amazing, especially if you like Snickers candy bars like me.

So here is a picture of the 1 piece that was left after Thanksgiving dinner.


The nice thing about this pie is it is so easy to make that I actually made it the morning of Thanksgiving in about a half hour.  And I used up the Snickers left over from Halloween by chopping them and sprinkling on top of the pie.

So here is the recipe that I made:

  • a single pie crust - prebaked

  • 4 king-sized Snickers candy bars 

  • 1/2 cup peanut butter

  • 1 1/2 tablespoons heavy whipping cream

  • 4 cups whipped topping


  • I melted the candy bars, peanut butter and heavy whipping cream in a double boiler until melted and all combined together.  Then I let it cool down for a few minutes - it didn't take long either.
    Combined this with a tub of extra creamy cool whip and put it in the pie shell.  Then I popped it in the freezer until after dinner.  When I served the pie I took chocolate syrup and swirled over the pie to make it look pretty.

    Once I was all done I went back and reread the recipe and discovered that I left a few ingredients out of my version.

    So here is Paula's recipe::

  • 1 1/2 cups graham cracker crumbs

  • 3 tablespoons sugar

  • 6 tablespoons butter, melted

  • 4 king-sized candy bars (nougat topped with peanuts and caramel covered with milk chocolate)

  • 1/2 cup peanut butter

  • 1 1/2 tablespoons half-and-half

  • 4 cups whipped topping

  • Additional whipped topping and chocolate syrup, for garnish


  • Heat the oven to 350 degrees F.
    To make crust, combine graham cracker crumbs, sugar and butter. Press down into the bottom of a pie pan to form a crust and bake for about 8 minutes.
    In the top of a double boiler, melt together candy bars, peanut butter, and half-and-half, stirring until smooth. Remove from heat and allow to cool slightly. Fold in whipped topping, pour into crust, and freeze for 4 to 6 hours before serving. (For a richer pie, substitute 2 cups heavy cream, whipped with 1/2 cup sugar until stiff peaks form, in place of prepared whipped topping.)
    When ready to serve, top with additional whipped topping and drizzle with chocolate syrup. Store in refrigerator.

    So a big OOPS there and maybe next time I will follow Paula's recipe a little better but I really liked it the way I made it.  Hubby did make the comment that it wasn't one of his favorite desserts that I make but the kids loved it and so did I. This would be a great summer dessert cause it is almost like an ice cream pie. 

    Let me know if you have every made this pie before and if your family liked it.

    Thanks for stopping by...
    C

    11/29/2010

    Let the Holidays begin...

    Let me just start by saying that I hope everyone had a wonderful Thanksgiving!!  We did here at our home, not only were both girls here and but also their boyfriends.  And we had a ton of yummy food and good times especially playing Pictionary after dinner.  Oh and I made a yummy new Paula Dean dessert that I will post later in the week for you.

    And then at midnight the girls and I did a little Black Friday shopping at our local outlet mall.  It was nice to see it so busy after the last couple of years that everyone has had.  All in all it was one of our best Thanksgivings.

    So now that Thanksgiving is behind us - it's time to get busy with Christmas.  Hubby and I were able to get about 97% of our shopping done on Saturday between going out and doing some online shopping.  I am feeling pretty good about were we are at with that.  And I am hoping that having so much done so early that I can enjoy the rest of the month.

    Having 4 days off was great because I actually got to spend some time in my craft room.  Let me show what I made....

    Remember these little goodies that I bought at IKEA for $3.99???


    I took one of those and added a little bit of this...


    And then I used my cricut and some green vinyl to cut this out...


    And ended up with this...


    This couldn't be an easier gift to make if you own a cricut.  When I was all done with this one, which took about a half hour from start to finish, I was thinking these would make a great Teacher's gift or just a gift to have on hand for an unexpected guest.  Or just a cute decoration on the table at the holidays.  And the really nice thing is they only cost about $5.00 when you are all done.

    Well I have one more to make so I better get to it.

    Thanks for stopping by...
    C


    11/19/2010

    Happy 50th Birthday

    My older sister turned 50 years old yesterday.  Which is really hard to believe because I can still remember when we were all younger and we would all play house together or build tents in the backyard.  Of course being the oldest she always thought she was the boss.  Time sure does fly by...

    So of course I couldn't let her birthday pass without making her something special to celebrate it.  Now I guess you should know that I am usually the smart ass in our family - pretty much always have been or as my sister likes to call me "brat".

    So remember this...


    Well I added some of this...


    And these....


    And came up with this for her...


    I would love to be there when she gets this, just to hear what she has to say.  Especially since I have been giving her such a hard time about turning 50.  She says she is doing just fine with it but I wanted to remind her that "50 SUCKS!"  :)


    Thanks for stopping by...
    C

    11/17/2010

    Who Knew??

    That glass etching with your Cricut is so easy and so cool?  I've had my etching cream for a while, I actually forgot that I had it.  I bought it for 40% online at Joann's.

    So anyway I found it the other day and decided to play around with it.  But first I went over to YouTube and found a video on using your cricut to etch glass.  There a a ton of them, that's how I know that I am behind on the latest thing. :)

    And then I ran out to Michael's and picked up a couple of boxes of votive candles to practice on.  I got 24 candles for a grand total of $7.00.  Not much money involved so I didn't really care if I made mistakes or not.  Plus I figured that I could always still use them and just hide them in other candle holders.

    So here are the candles that I've done so far.  I have some other projects in mind but first I need to practice more.


    I use the new Cindy Loo Cricut Cartridge for the "JOY" candles


    Pretty cool, huh???  Have you used your cricut do any glass etching?

    Thanks for stopping by...
    C

    11/16/2010

    Happy Fall Card

    I know we are pretty well into Fall and just about to winter but I've been wanting to use this stamp with the fall saying and I need to get a card out to my niece so what a great excuse to use it.

    I love how this card came out.  The background paper is by no means a "fall" themed paper but it has all the right colors in it.  And I know that I am a little behind but I really love the felt leaves that I used on it.  I am thinking I am going to have to try to cut some with my cricut.  And the best part of this card is that everything is bits and pieces that I had in my stash - except the leaves.  Those I picked up this past weekend at the crop Kendall and I went too.  Which by the way, we had a great time again.

    So here's the card. 


    And wait until you see what I did with this.....


    Thanks for stopping by...
    C

    11/09/2010

    Happy Birthday!!

    So over on 2Peas there was a post about being matched up with a Pen Pal and I signed up.  Well I got really lucky with the Pen Pal that I got.  Liz and I have so much in common and are having a great time getting to know each other.

    She is a dog lover just like so she can't help but be an awesome person  :)  Anyway her Birthday is on the 11th and this is the card that I made for her.


    I actually got the card sketch out of my "Originals" book that I got from hubby for Christmas last year.  I love that book along with the "Wishes" one.  This card was a boy card but I changed the colors to make it a girl card.  And I got to use one of the borders that I have for my cuttlebug that I hadn't used yet.   I sure hope she likes it.

    Thanks for stopping by...
    C

    11/08/2010

    What a Lucky Girl!!

    Saturday was the best day!!  My sweet hubby took me to the Sacramento Scrapbook Expo and Ikea all in one day!!  Poor hubby doesn't like crowds and hates going shopping with me because I am notorious for spending a good 15 - 20 minutes looking at something and then walking out of the store without buying anything - drives the poor man crazy. :)

    But we did have a specific reason for going this weekend.  My middle sister is moving this coming weekend to TN (I will really miss her) and my oldest sister and 2 of her girls were coming down to Sac from Reno for the Expo so we decided to meet up for a visit and so my sisters could say good bye to each other.  Really trying hard not to think about all this too much as it makes me want to cry.  Here is a picture of the 3 of us.


    So the trip to Ikea was because I found this awesome project on the Cricut boards (I am so sorry I can't remember the gals name that made these cause I really want to give her credit)


    So I went online to order the lanterns from Ikea but of course you can't - you to have to actually buy them at the store.  So hubby was nice enough to say that we would stop by there on the way back from the Expo.  Boy was that a mistake :)  I had so much fun in there and bought several things.  This was definitely one of those times that I didn't have trouble shopping at all.

    I bought 3 of these to make the above project for my girls and I.  And what a bargain at $3.99 a piece


    Oh and see the black one?  That's for a Halloween project for next year.

    And then I saw this and feel in love.  I am not sure if I am going to keep it or doing something with it for a Christmas gift for my parents.  Another bargain at $7.99 - now I wished I would have gotten 2 of them.


    Let's see I also walked out of there with these.  Another fab bargain at $2.99 a package.  I got Cinnamon Apple, Rose and Green Apple.


    And there were a couple of other things I bought but you will just have to keep checking back to see what they were and what I do with them. ;)

    And I had just as much fun at the Expo.  Didn't buy as much there but did come home with some goodies.


    These 2 are for our Pumpkin Dinner Album at title pages


    This is 2 pages - the other page is just the opposite of this one.


    So as you can see it was a pretty good shopping trip.  I can't wait to go back to Ikea :)

    Thanks for stopping by...
    C


    11/04/2010

    A Yummy Dinner

    I found a recipe online for Bake Pork Chops and decided to try it for dinner.  This recipe was extremely easy and turned out so good.  I especially like that it took about 10 minutes to prepare the pork chops and then you pop them in the over for 25 minutes and TA DA...dinner is served.  I made some Stove Top Stuffing and steamed veggies and in about 30 minutes we had a really nice dinner.


    Here is the recipe if you want to try it:

    Oven Baked Pork Chops

    1 egg
    2 Tablspoons milk
    1 cup Italian Bread crumbs
    1/4 cup grated Parmesan cheese
    1 clove garlic
    3 Tablespoons Olive Oil
    A handful of mozzarella cheese

    Mix the egg and milk together in a shallow dish.
    Combine the Bread crumbs and Parmesan cheese together in a plate

    Dip your pork chops in the milk and egg and then roll them in the bread crumbs.  I patted mine on each side so that I made sure the crumbs stuck really good.

    Heat your olive oil in an oven proof skillet and brown the clove of garlic.  Once the garlic is browned take it out of the oil.  Add the pork chops and brown them on each side.
    Heat your oven to 325 and pop the skillet with the pork chops in for 25 minutes.

    Pull them out and put the mozzarella cheese on top and return to the oven until melted.  Takes just a couple minutes so keep your eye on them.

    And Enjoy!!

    Thanks for stopping by...
    C

    11/03/2010

    Happy Halloween...a couple days late

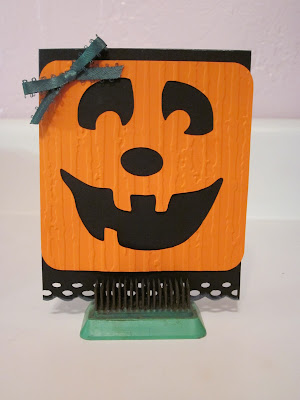
    So I know that Halloween was a couple of days ago but I really wanted to share these cards with you.

    I made both of these for some girlfriends of mine.  I even went out and bought the MS Scoreboard with a 50% off coupon so that I could make the rosette on this first card.


    This second card I made using Cricut Pumpkin Carving cartridge and my Cuddlebug.  I thought it came out pretty cute.  This was the one and only time I got to use this cartridge this year.  Can't wait to use it more next year especially with some cricut vinyl.


    And this beautiful card I can't take credit for because a friend of mine sent it to me.  Isn't she talented???  And she made that adorable broom too.  I would have never thought of that..... 


    So I just wanted to add note to my post yesterday.  When I said we usually spend between $60-$80 on pumpkins, it is for 6 huge pumpkins.  I know still crazy but just wanted to put it out there.......

    Thanks for stopping by...
    C

    11/02/2010

    Our Annual Pumpkin Dinner

    Our Annual Pumpkin Dinner was on the Saturday night before Halloween.  And unfortunately it poured starting the night before and all day long.  In fact we got almost 4 inches of rain that weekend. 

    So our favorite pumpkin farm was closed due to the rain.  Here is what it looked like:


    Pretty grey and rainy.  And the adobe mud around here is like cement when you get it on your shoes.  So hubby and I went to Raley's to pick out pumpkins for the group. 


    And how nice was to only pay this price instead of the usual $60-$80 that we usually spend at the pumpkin farm.

    Here is the table before everyone arrived for the evening.  And notice the big pumpkin soup tureen in the middle of the table?  That was my splurge this year from Crate and Barrel.  Kendall found it for me and it was too cool to pass up since we have homemade soup every year at our dinner.


    Here are the treat jars that I made for everyone this year.  They came out so cute and hold exactly 1 pound of candy... :)  


    I also decided at the last minute to make these placemats for the table with my Cricut and Sure Cuts Alot software.  I thought they turned out pretty neat. 


    Did you notice the green funny lips at the top of the placemat?  I found 8 different ones and everyone had to wear them for a picture.  We had so much fun with these....


    And these were our Adult beverages for the evening.  Really makes you want to have a glass doesn't it??


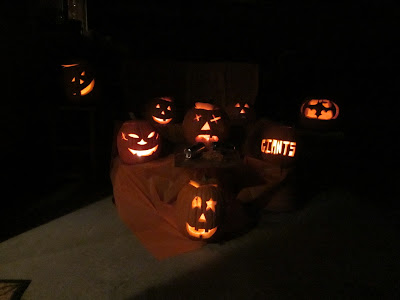
    And the finally the finished product of the night.  They all came out great and yes there were a couple of Giants fans here that night.  Too bad none of these guys made to Halloween night, the weather just didn't help and they only last about 5 days after carving them.


    Well I hope you've enjoyed our Pumpkin Dinner as much as we did.  Can't wait for next year!!!

    Thanks for stopping by...
    C